Welcome to our website !

TopazTurtle Handmade


Need a quick decoration idea for an upcoming celebration? Then you might want to consider this wreath that you can print and fold yourself.

You will need 
12 sheets of paper, 
the PDF download from below 
a colour printer, 
a gluestick 
some Blu-Tack or double sided tape.

Each folded knot is 3 5/8 inch in width and it makes a 13 inch wreath.

I got the idea for the basic folded knot shape from a mathematics book of all things. It was talking about model building and the shapes you can make with paper. This one shape had so many possibilities. And it uses the same techniques you would use in tying a knot.


Download the Tri-Colour wreath file below and print 10 copies of the pattern pages and cut out the shapes.

Glue the pieces together. The angled end of the piece marked Tab 2, should be glued on top of Tab 1. Match up the dotted lines to glue it accurately.

Similarly the angled side of the piece with Tab 3 should be glued on top of Tab 2. The angled side of the piece with no tab needs to be glued on top of Tab 3.

You should get a long paper strip with three joins

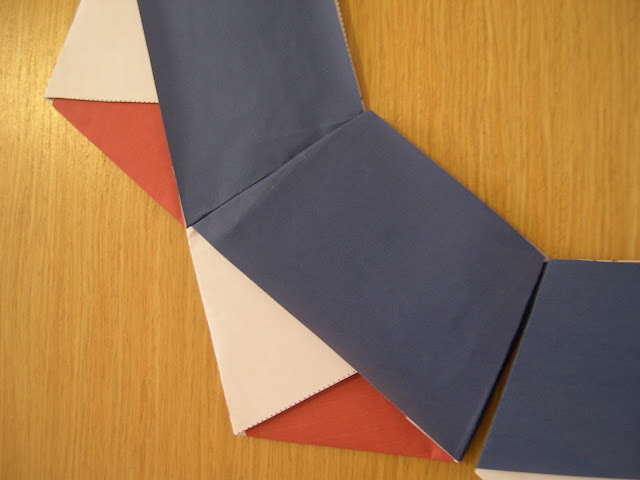
Folding the strip into the final shape is similar to tying a knot. Start by making a fold at the second join on the strip using the dotted line as a guide. (The Arrow in the figure below points to the second join.)


Your strip of folded paper should look like the inverted letter V.


Now bring the next join to fold over one of the arms on the V and fold so that it looks like the figure below. Make sure you get the V shape by matching the dotted line to the corners and edge of the strip below.


You should now have a loop with a short arm and a long arm. Make sure the long arm sits on top of the short arm.

Now take the end of the long arm and fold it under the short arm. Pull the strip through the loop made by the crossing over of the short arm and long arm. Make sure you get a nice tight folded knot.


Fold over the remaining arms and tuck the end pieces into the slot made by the folded sides.

Your first folded knot is now ready.

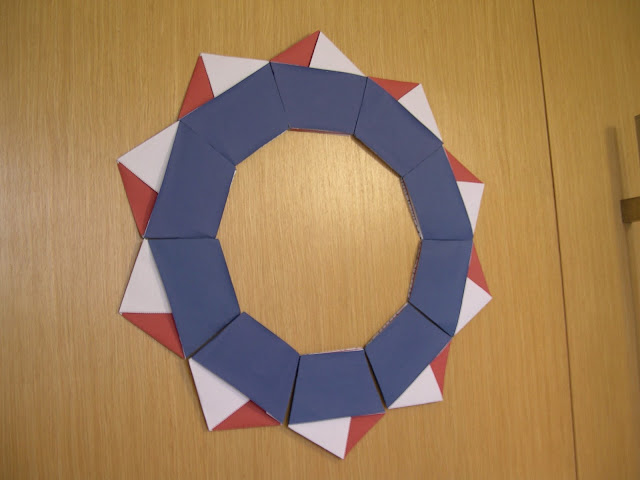
Repeat until you have 10 folded knots. Place out your ten folded knots and make sure they are aligned the same ie. All the shapes have the red triangle on the left and the white triangle on the right. You can do the reverse as well. Just make sure all your folded knots are facing the right way.


Place a small piece of Blu-Tack on the reverse of your folded knot and stick it onto the place you want to decorate, eg window, door or wall.

Then arrange the second knot by placing it next to the first folded knot and match the adjacent blue corners together. 


Continue doing so for the remaining knots and you will end up closing the circle and your wreath is complete.

I also have other sizes and colours for the folded knots in my shop. If you are into colouring, check out my range of colouring and folded knots that will be available soon.

And to all my American friends - have a great 4th of July holiday! 
Tricolour Wreath Pattern Download


I first ate empanada at my friend Veronica's place. Her family comes from the north of Spain and her mother makes a great empanada. She showed me how she makes it and it's her recipe that I have shared  here with you.


It makes a great dinner served with a salad. This is a recipe that can be made ahead of time  as it's delicious cold.

Don't skip the step to rest the dough after kneading. A well rested dough makes for a light and flaky pastry.

Mrs. Fernandez's Empanada
14 oz of flour
5oz olive oil
cold water
1 cinnamon stick
2 cloves
2  cans of tuna
3 Spanish or red onions
1 tablespoon chilli powder
salt and pepper to taste


Peel the onions and slice finely. Heat the oil in a pan and fry the onions, cinnamon and cloves  on low to medium heat until the onions are soft and golden brown. You might need to fry the onions in two lots to get them evenly cooked. Keep the cinnamon and cloves in the oil for the entire time so that the flavours infuse into the oil.

Drain the onions, cinnamon and cloves and keep the leftover oil separately as this will be used to make the pastry. Discard the cloves and cinnamon.

Place the flour in a large mixing bowl with 1/4 teaspoon of salt. Rub the oil into the flour.  Add enough water to make a stiff dough. Knead  for 5 minutes until the flour, water and oil are evenly mixed. Leave the dough in a covered bowl for at least an hour. If you skip this step, the pastry will be hard and chewy.


To make the filling, drain off the cans of tuna and place the tuna in a large mixing bowl. Toss in the fried onions, chilli powder and salt and pepper to taste. Mix thoroughly and set aside.

After the dough has rested for an hour, divide it into equal halves. Take one portion and roll it into a circle an until the pastry is at least 1/8 inch thick.  The dough should be soft. If it is elastic and pulls in as you roll, you need to let it rest for longer. Place the circle of pastry on your baking tray.

Place the filling in the middle of the pastry circle and flatten it evenly. Leave a half inch margin around the edges to seal the empanada.  Roll the second half of the pastry dough into a similar sized circle as your first. Place it on top of the filling and seal the edges. You an either press down a fork on th edges to seal it or you can use your thumb and forefinger to press and roll the edge into a fluted pattern.


Cut steam holes on the surface of the empanada in any pattern you prefer.

Bake the empanada in a preheated 180 degrees oven until golden brown. That should take between 20 to 30 minutes.

Cool before serving.


I was in Singapore recently and, while I didn't plan to, I ended up visiting two very different gardens the two days I was there.


One was Singapore's Gardens by the Bay. Beautifully designed and maintained gardens built on reclaimed land. It has quickly become a huge tourist attraction for the island nation. 

I was taken there around sunset so that I could catch the daily light show that takes places at the super trees. 

What's a super tree I hear you ask? It's a huge 2 to 3 storey metal structure in the shape of a tree that is used as a support for various species of orchids, bromeliads, air plants  and flowering creepers. One of the trees even has a revolving restaurant at the top. They make a colourful tapestry as they grow up the sides of the super tree.


There is also a bridge suspended from the super trees that patrons can walk along to enjoy an aerial view of the gardens. I was wearing a dress, so there was no way I was going to attempt the bridge walk that night!

The second garden was on a much smaller scale but much more impressive in my books. My uncle, took me to see some vegetable gardens that residents of a nearby housing development board (HDB) apartments had created. 

I was expecting to see herbs, green vegetables and beans at the most. I wasn't expecting a test garden for varieties of fruits and vegetables from other parts of the world. 

We were lucky enough to meet one of the gardeners, watering his plants. Mr. Lee had one of the healthiest and most abundant gardens in the place. 


Each plot has been fenced along the sides and the top to keep out birds and small animals. It varies in size but Mr Lee's was about 2 metres by 5 metres. There were two types of grapevines growing along the top support structure, rare chinese dates, purple chilli plants, a curry leaf plant, spinach, choy sum, kailan, other herbs and a variety of flowering plants. He also had two large pots - one with a lotus and another with a waterlily. And both pots had iridescent guppies swimming around. They are pretty to look at and they eat up all the mosquito larvae.

Mr Lee, who was very kind in answering all our questions, said he developed his garden primarily for exercise. He started by getting permission to farm the strips of land next to the walkway near his HDB flats and his garden grew from then on.

It's obviously a labour of love for Mr. Lee. He goes on trips to Europe, China and America to source plants for his garden. He also goes out after dark with a torch to pick off slugs and snails. He says that's the only way to bring them under control. He does this for 3 days running and his plants are safe from the depredations of these creepy crawlies for a time.


Other residents have also joined in and started their own gardens. Now the whole strip of land is full of vegetables and flowering plants. 

I thought what these residents were doing really wonderful and special, considering how many people live in apartments in Singapore. It's wonderful that they get the opportunity to work the land and special that they feel the need to connect with the land. This is one of the places I want to visit again to see how it progresses over the years.

Unfortunately, I have no pictures. Long story for another time. The photos you see here though are from my uncle's garden in Singapore. The plants were so pretty, I just had to take pictures.


I had a whole heap of overipe bananas at home and instead of letting it go to waste I decided to make some banana bread.

We haven't had any in a long time and I think it was time for some.


However, when I went to gather my ingredients, I found I was out off butter. I'd finished it last week making a cake and hadn't had time to go out and get some.

I didn't feel like rushing out to the supermarket so I went online to see what else I could make. Lo and behold I came across a recipe for banana bread that uses yoghurt instead of butter. I did have yoghurt! So off I went to try out the recipe.

The recipe for Greek Yoghurt Banana bread, is from the Running With Spoons blog, also asks for maple syrup and brown sugar and said the brown sugar could be omitted for a less sweet banana bread. As I had no maple syrup on hand, I left that out and added the brown sugar instead.

It was so simple to make  and I had the bread in the oven in no time at all. 


I'm very happy with the recipe. The bread was moist and crumbly and it had a nice soft and chewy crust. I imagine it will be yummy toasted and eaten with butter, jam or honey. Guess what I am going to be having for breakfast tomorrow?